

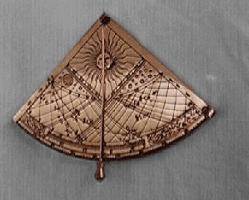
During the renaissance, if a sailor lost sight of land he needed to have a method available to him which would help him determine his direction. The quadrant was an instrument which allowed him to work out which latitude he was at:

We had already covered some navigational methods used by the explorers during the time of the explorers age. These included making a chip log, a sand glass and a compass. Collectively these are known as dead reckoning and, as methods of navigation, were very unreliable.
Often, therefore, the sailor would turn to celestial navigation. Sailors in the past would have been very familiar with the movement of the stars across the sky at night-time. The most important star to recognise was the Polaris or North Star:

The North Star or Polaris is known as such because of its position relative to the North Pole:

Once a sailor knew where Polaris was, he would also know where North was, and therefore South and so on. However, simply finding the North star would not tell the explorer where he was on the globe, only which direction he was heading in. This is where having a quadrant came in handy.
Navigators were able to calculate how far north of the equator they were by measuring the altitude of the North Star from the visible horizon. The altitude describes the height of the North Star measured as an angle. This measurement of altitude could then be converted into the ship’s latitude position. If Polaris is on the horizon, the quadrant will measure no angle (0 degrees latitude). In this instance the ship would be on the equator. If Polaris is situated at a 59 degree angle, then the ship is at 59 degrees latitude or 59 degrees North.
Whilst the Tudor explorers were able to measure latitude (how far north they are away from the equator) there were not the tools to measure longitude yet (distance from the prime meridian). This meant they could not obtain the exact position of their ship.
An additional problem arose from the quadrant reading itself. As we would soon find out, getting an accurate reading on terra firma was hard enough, we couldn’t even imagine attempting to obtain one on a rocky ship!
Making our own quadrant

- We gathered supplies: thick card, string, a metal button as a weight and a photocopy of a quadrant (found here)
- The children cut out the quadrant and a similar shaped and sized piece of card, sticking one to the other. A piece of string was then attached to the corner. A button was attached to the other end of the string:

- Each child attempted to measure ‘latitude’ by pointing towards a fixed point (it was a rainy day and there were no stars (on account of it being day light) and no sun, so just to practice using the quadrant and to give us an idea how it worked, we pretended the roof of the house was Polaris 🙂
T13 got it straight away:

L12 required a bit of help, which T was more than happy to give:

After which she was able to use it herself:

As for C12? Not a clue. I know she did it, but I don’t have even one photo of her. Poor girl.
Cool! I’m really enjoying your explorer posts. Thank you for sharing!
Thank you Rachel!
We had fun with those, too! I remember Quentin saying that he felt like a real sailor.
Lol! I’ll bet he would have made the cutest sailor!
This explorers unit really reminds me of how ingenious people are to have created these tools and how brave to navigate with them!
I know! I would have made a naff sailor. I like my comforts too much!
We played around making one of these about five years ago – but thought we were making an astrolabe (someone set us straight in comments). Looking back at that post, I realize there was follow-up we wanted to do, that we never did. Thanks for the reminder! I love the shots of T helping L12. What a kind brotherly moment 🙂
They do happen occasionally 🙂